Managing Your Data
4.1. Alter Default Terms of Use
For more on Licensing and Permissions, go here.
- Alter the default Terms of Use for your dataset(s). Default is Creative Commons Zero (CC0) (i.e., a public domain dedication that reserves no rights).
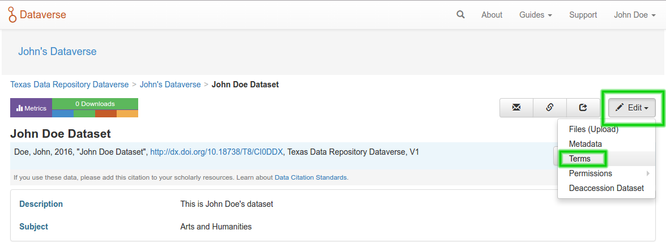
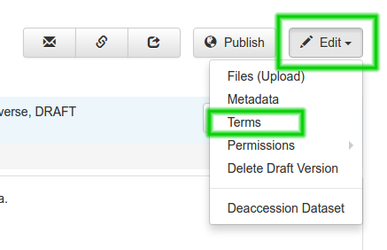
- Set up Terms of Use by clicking Edit and selecting the Terms tab.
- The default terms is a CC0 public domain dedication. CC0 facilitates reuse and extensibility of research data.
- You may also choose to establish custom terms of use by selecting "No, do not apply CC0 - Public Domain Dedication" and define the custom terms in the resulting textbox.

- You are required to set up terms of use for all datasets you designate as restricted. You may allow users to request access to restricted datasets using the Request Access option.
For more on Licensing and Permissions, go here.
4.2. Make your Dataset Restricted
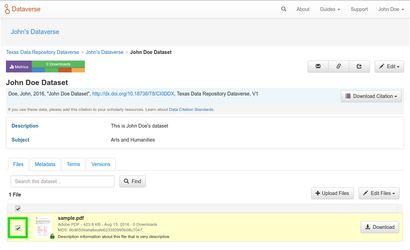
1. Access your dataset, scroll down to the list of files, select the file(s) you would like to restrict using the check boxes next to each file.
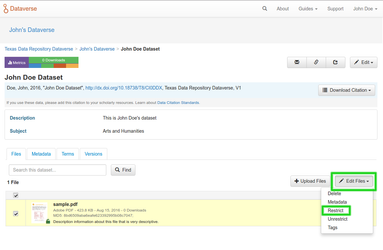
2. Click Edit Files and select Restrict.
3. A pop-up window will appear. Please describe the terms of access, which will inform users how and if they can gain access to the restricted files.
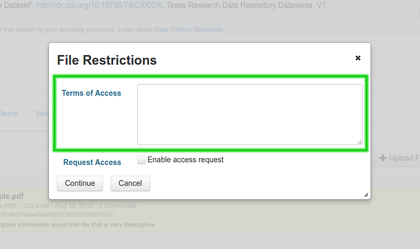
4. If you want users to be able to request access, select the checkbox marked Enable Access Request. Click Continue.
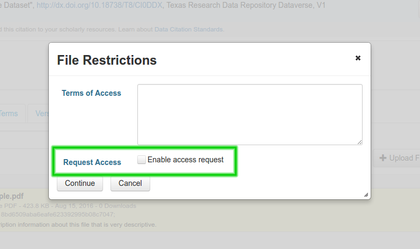
5. Your selected data files are now restricted.
4.3. Create Multiple Versions of a Dataset
Unpublished datasets are 'Draft Datasets." Once published, the dataset will be assigned to the category "Version 1." Changes made to the dataset (see below) will result in the creation of a new version.
- You may choose whether the changes merit a small change to Version 1.1 or a more significant change to Version 2.0 and so on.
- An example of a small change to Version 1.1 includes a typo correction or a small metadata change. Whereas, a citation change or the addition of a new data column may mean choosing Version 2.0 is appropriate.
- The addition of a new file automatically changes the version to the next whole number. For example, if the dataset is Version 1.0 and a file is added, the system automatically creates a Version 2.0.
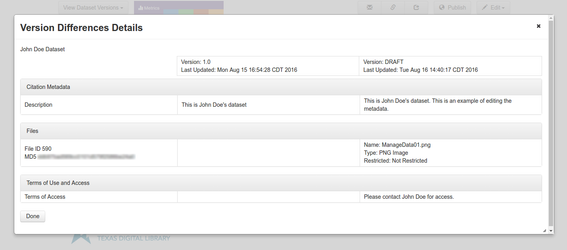
All versions are available to be viewed by the administrator or curator, and can be made available to the public. This includes Draft Dataset versions.Click the Versions tab to view all versions and see the changes.
1. Click the Versions tab to view all versions and see the changes.

2. Click Show Details in the Versions tab for more information about additions and edits.
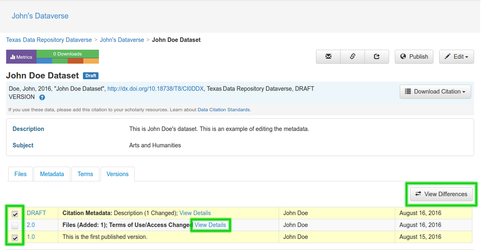
3. Use the Show Differences option when comparing two versions to identify particular differences.
4.4. Deaccession a Dataset
Deaccessioning is reserved for circumstances in which there is a significant, often legal, case for the removal of public access to a dataset. To deaccession a dataset:
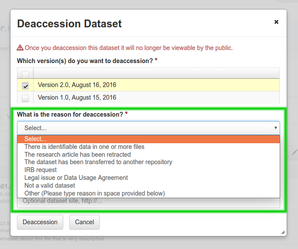
1. Click Edit and select Deaccession Dataset.
.png?version=2&modificationDate=1541621644762&cacheVersion=1&api=v2&width=575&height=250)
2. You will have the option to deaccession particular versions or an entire dataset.
3. You are required to include the reason to deaccessioning the dataset.
If a user navigates to a deaccessioned dataset's persistent URL, they will see a landing page with the citation for the dataset, but not any files or metadata that were deaccessioned.

4.5. Turn on the Guestbook Feature
Guestbooks allow you to collect data about who is downloading the files from your datasets within a Dataverse collection for which you are the administrator. You can decide to collect account information (username, given name and last name, affiliation, etc.) as well as create custom questions (e.g. What do you plan to use this data for?). You are also able to download the data collected from the enabled guestbooks as Excel files to store and use outside of the Dataverse software.
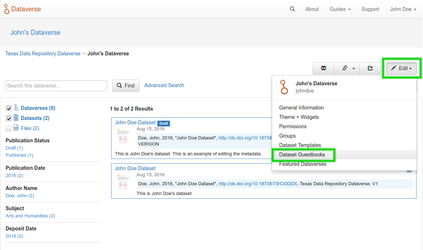
1. From your Dataverse collection page, click on the Edit button and select Dataset Guestbook.
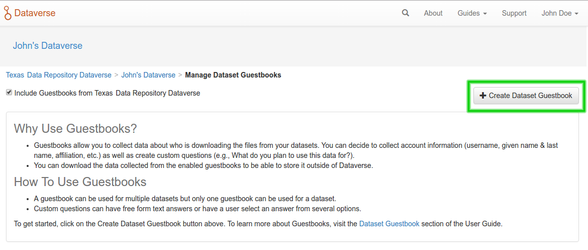
2. By default, guestbooks created in the Dataverse software your Dataverse collection is in will appear. If you do not want to use or see those guestbooks, uncheck the checkbox that says include Guestbooks and Root Dataverse.
3. To create a new guestbook, click the Create Dataset Guestbook button on the right side of the page.
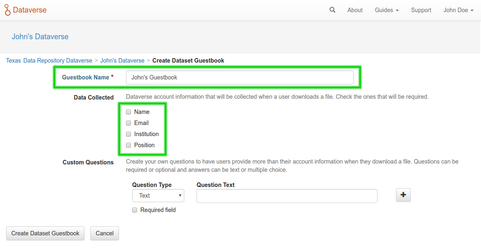
4. Name the guestbook, determine the account information that you would like to be required (all account information fields show when someone downloads a file), and then add Custom Questions (i.e., for users to answer before being allowed to download data; can be required or not required).
5. Hit the Create Dataset Guestbook button once you have finished.

To assign a guestbook to a particular dataset:
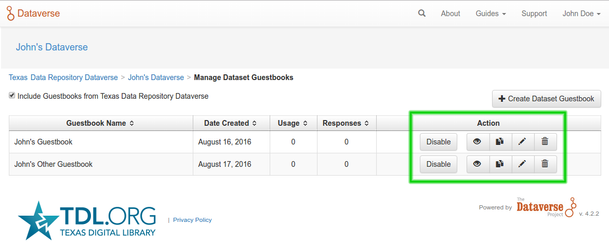
1. Click the button in the Action column that says Enable. A guestbook is enabled by default upon creation.
2. Once a guestbook has been enabled, go to Terms for a dataset and select a guestbook for it.

3. Select the Terms tab.
4. Click on Edit Terms Requirements.
5. Select the guestbook you intend to use.
There are also options to view, copy, edit, or delete a guestbook. Once someone has downloaded a file in a dataset where a guestbook has been assigned, an option to download collected data will appear.
4.6. Add a logo to your Dataverse collection
After creating a new Dataverse collection:
1. Click the Edit button.
2. Click on Theme + Widgets.

3. Use Upload Image to add a logo.

4. Use Header Colors, Tagline, and Website to provide additional customization.
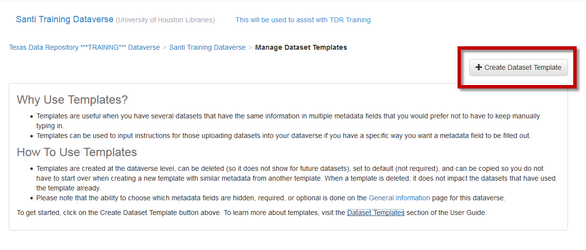
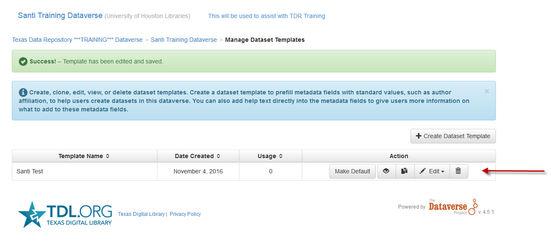
4.7. Dataset Templates
Templates are useful when you have several datasets that have the same information in multiple metadata fields that you would prefer not to have to keep maunally typing in or want to use a custom set of Terms of Use and Access for multiple datasets in a Dataverse collection. Dataverse collection templates created at the Dataverse collection level can be deleted (so it does not show for future datasets), set to default (not required), or can be copied so you do not have to start over when creating a new template with similar metadata from another template. When a template is deleted, it does not impact the datasets that have used the template already.
How do you create a template?
1. Navigate to your Dataverse collection, click on the Edit Dataverse button and select Dataset Templates.
2. Once you have clicked on Dataset Templates, you will be brought to the Dataset Templates page. On this page, you can 1) decide to use the dataset templates from your parent Dataverse collection, 2) create a new dataset template, or 3) do both
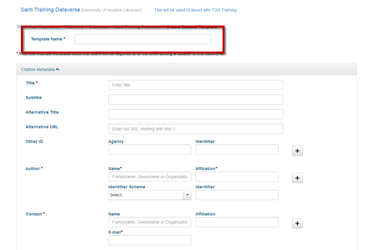
3. Click on the Create Dataset Template to get started. You will see that the template is the same as the create dataset page with an additional field at the top of the page to add a name for the template.
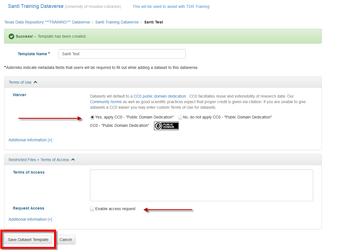
4. After adding information into the metadata fields you have information for and clicking Save and Add Terms, you will be brought to the page where you can add custom Terms of Use and Access. If you do not need custom Terms of Use and Access, click the Save Dataset Template, and only the metadata fields will be saved.
5. After clicking Save Dataset Template, you will be brought back to the Manage Dataset Templates page and should see your template listed there now with the make default, edit, view, or delete options.
6. A Dataverse collection does not have to have a default template and users can select which template they would like to use while on the Create Dataset page.
7. You can also click on the View button on the Manage Dataset Templates page to see what metadata fields have information filled in.
*Please note that the ability to choose which metadata fields are hidden, required, or optional is done on the General Information page for the Dataverse repository (TDR).