View and Manage Files
Document Management in Vireo
Vireo has several options for managing the primary and supplementary files associated with the ETD record. There are two primary locations where files can be managed within an ETD record.
At the top left of the View tab for an ETD record is the Active Document box. This box includes a link for downloading the primary ETD document, as well as a couple of options for looking at and adding new files.

All of the files associated with the ETD record are listed at the bottom of the View tab, below the Action Log. This ALL FILES section lists every file uploaded to the record, including the initial primary document, supplementary documents, notes or correction documents uploaded by administrative staff, and replacement documents for the primary ETD and supplementary files.
|

Opening Files
Administrative users can look at files associated with an ETD record in two ways:
- To open the primary ETD document, click on the DOWNLOAD link in the Active Document box.
- Alternately, click VIEW ALL FILES in the Active Document box (or scroll down to the ALL FILES section) and click on any of the file names listed.
Adding or replacing files
To upload a new primary document, supplementary file, or notes file, click on UPLOAD NEW FILE in the Active Document box. New files can also be added by clicking ADD FILE at the bottom of the ALL FILES list.
In either case, the ADD FILE popup box will appear.
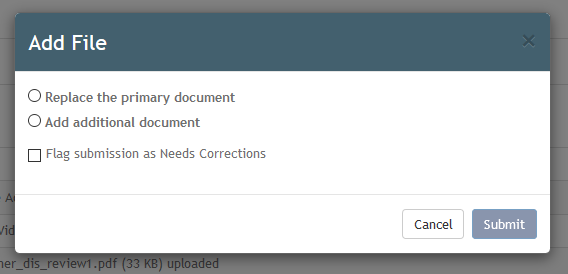
On this screen a user can Replace the primary document or upload additional documents of the the following type:
- New primary document
- Supplementary document
- License
- Archived document (old version of the primary document)
- Feedback document
- Administrative document
- Source file
- Unknown document type
To upload a document, select the radio button that describes the type of document to be added.

A “Choose file” field will appear. Click the arrow to browse and find the file, or drag and drop the file into the box. To send emails or change the submission status to NEEDS CORRECTION, follow the directions below to do so. Click SUBMIT to complete the action.
The action(s) will be documented in the Action Log, and the uploaded files will appear in the ALL FILES section of the screen.
Each new file will be labeled according to type (Primary document, supplementary file, etc.). If uploading a replacement primary file, the old primary file will remain in the file list, but will take on the label “Archived.”
Sending Email
When uploading a new/replacement file from this screen, a user may also choose to notify the student (and possibly copy the faculty advisor) via email.
For instance, an institutional workflow might call for the administrative user to upload a document detailing necessary corrections to the initial ETD submission. When the administrative user uploads that document, s/he can simultaneously email the student to notify him/her that corrections are required. That email (possibly from an email template) might direct the student to a URL that will take him/her into the student submission interface, where he/she could view the corrections document in the Action Log.
To email the student when uploading a file, click on UPLOAD NEW FILE in the Active Document box. New files can also be added by clicking ADD NEW FILES at the bottom of the ALL FILES list.
In the UPDATE SUBMISSION popup box, select the type of file and browse for the file. Next, select the ADD EMAIL RECIPIENTS and/or ADD CC RECIPIENTS checkbox. A text box for the email message will appear.
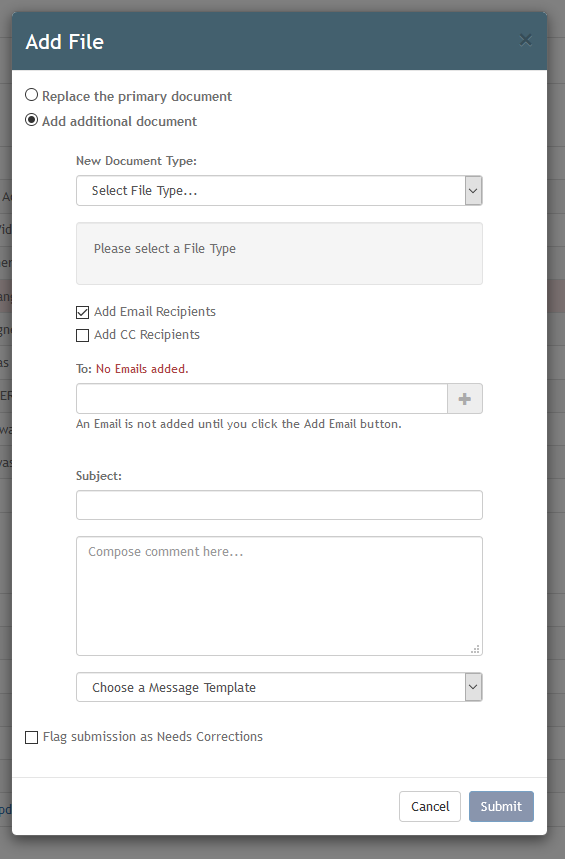
Type in the roles (such as SUBMITTER or COMMITTEE CHAIR) or the individual email addresses in the TO and/or CC fields, then lick on the plus sign ( + ) icon to add.
Compose a message in the textbox, or choose an email template from the dropdown list.
When finished, click SUBMIT, and return to the View tab. All actions (including the document upload and the email) will be logged in the Action Log.
Flag submission as Needs Corrections
When uploading a file, a user may also simultaneously change the status of the submission to NEEDS CORRECTION by selecting the FLAG SUBMISSION AS NEEDS CORRECTIONS checkbox.